


Converting an HL Panther "G" into a late "A"


 10-08-2014, 04:42 AM
#52
Senior Member

Join Date: Nov 2006
Location: Grande Prairie,
AB, CANADA
Posts: 8,976
Likes: 0
Received 4 Likes
on
4 Posts
Very nice. A lot of work and effort and going into this, and you are demonstrating some fine modeling..
Also thanks for taking the time to document the process.
Also thanks for taking the time to document the process.
10-08-2014, 10:00 AM
#53

Thanks Dan. I try! LOL!
I have learned a lot by reading full builds on this and other sites even if I just pick up one little hint so I don't mind returning the favour and if somebody see something they can use all the better!
I have learned a lot by reading full builds on this and other sites even if I just pick up one little hint so I don't mind returning the favour and if somebody see something they can use all the better!
10-21-2014, 08:27 PM
#54
And so we continue.... 
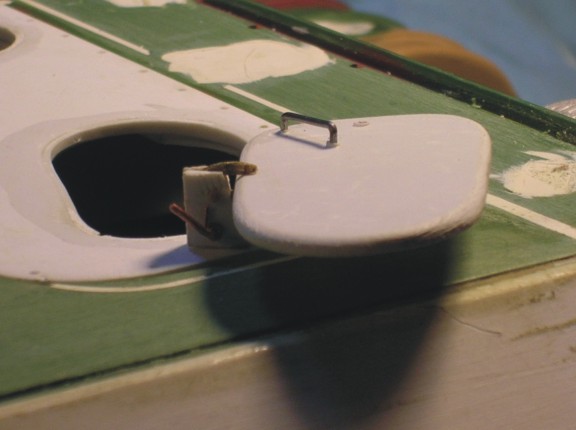
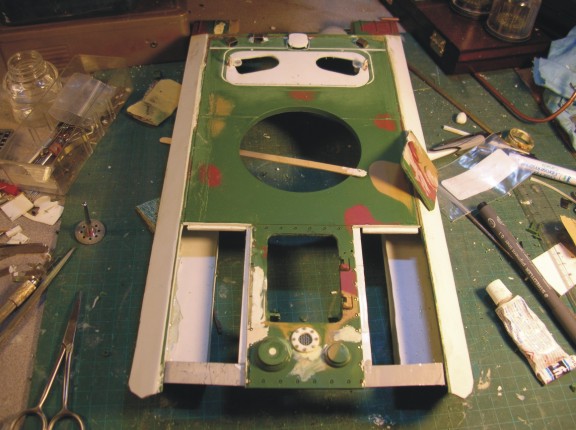
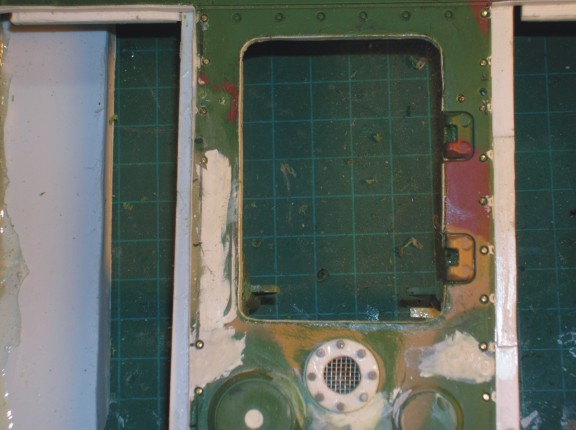
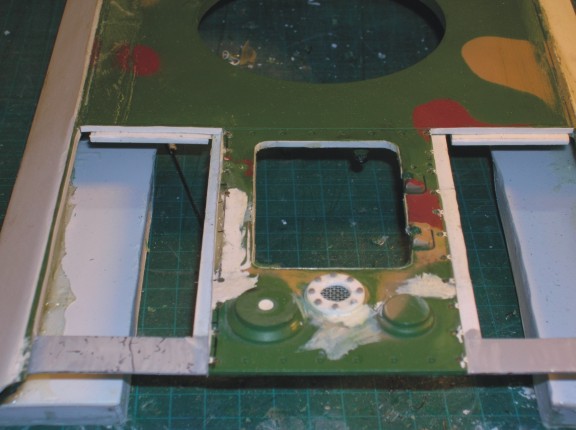
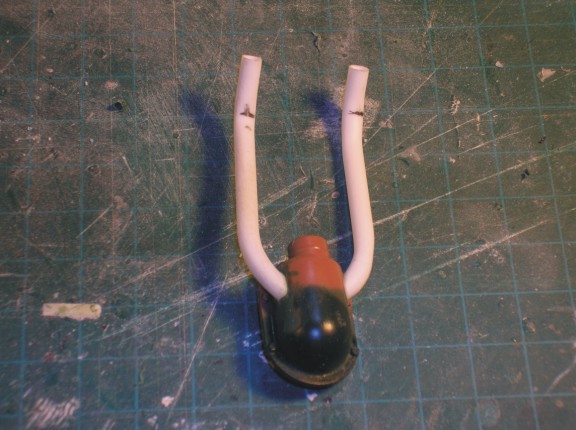
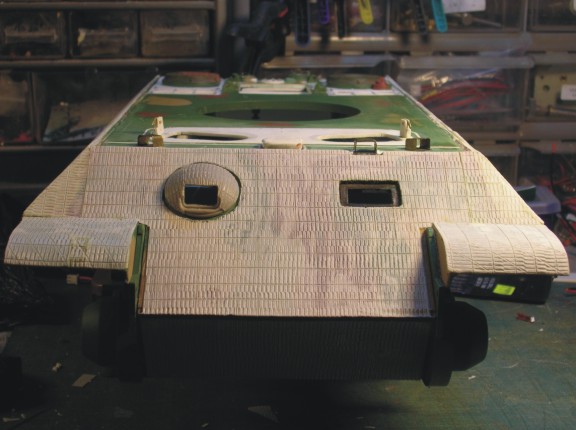
I thought it was time to do the hatches. I was not looking forward to it because I wanted to make them sort of operational but easy enough if one got snapped off during battle it would be easy to fix.
 Panther A 101.jpg (46.51 KiB) Viewed 1 time
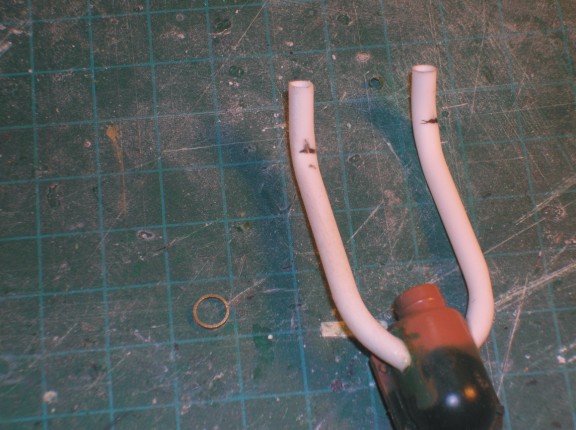
I also wanted to make it sort of look like the real thing so I needed a tube that would have an inner tube to slide up and down and what I came up with was the end of a syringe cut off and mounted to look like the main support tube on the real thing.
 Panther A 102.jpg (54.49 KiB) Viewed 1 time
 Panther A 103.jpg (53.71 KiB) Viewed 1 time
 Panther A 104.jpg (38.59 KiB) Viewed 1 time
Then I used a thinned down piece of copper tube that fits nice and snug in the syringe end.
 Panther A 105.jpg (40.67 KiB) Viewed 1 time
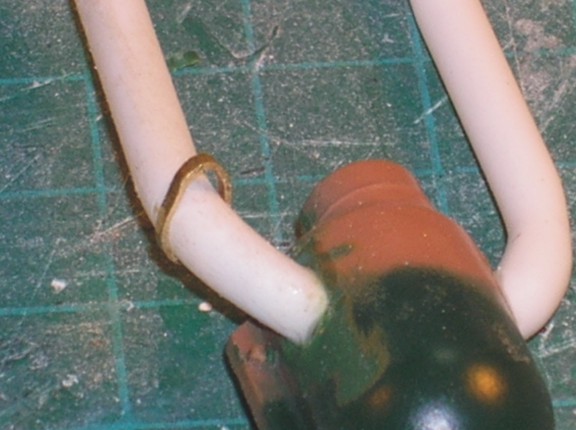
well I waited for the superglue to dry thought I would add the lift handles. Now, this is a trick I use to mount my handles. I don't think I have shown it before. Sometimes getting the holes right for the handles can be tough. you make them too narrow so you have to bend the handle ends in to fit in the holes or too wide and you have to open up the handle too much and it doesn't look right so here is what I do. Make your perfect shaped handle out of a paper clip and have the ends longer than they should be so they will go into the plastic. Drill one small hole for one end of the handle to go in as a guide. Don't drill it deep just a small hole to seat the end in. Now, gently touch a hot soldering iron to it and put some slight pressure on it and it will start to go down into the plastic. Watch your depth so they don't go too far in. Once you have it right and have stopped applying heat you will find that it is pretty sturdy and shouldn't need glue. Also you can see a little of the melted plastic pushes up around the handle so you can score this with an xacto knife and it will look like weld bead!
 Panther A 106.jpg (32.37 KiB) Viewed 1 time
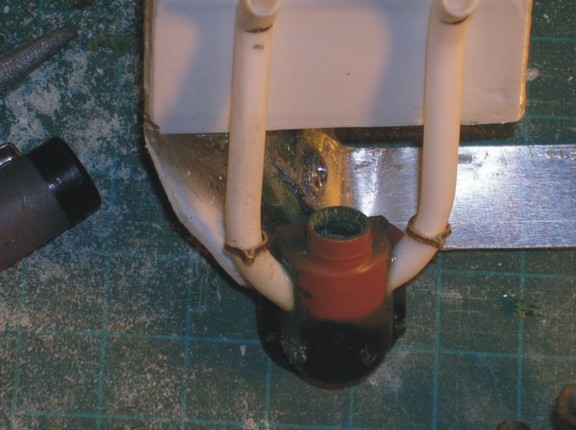
Now I wanted to make the stops so some 2mm styrene and some sturdy brass sheet and got to work on them. I used a saw to make a split down the plastic on the ends of a long piece then cut it in half to make the 2 stops. The brass I drew the rough shape on and formed it with a dremel on slow with the piece held in hobby forceps.
 Panther A 107.jpg (66.76 KiB) Viewed 1 time
 Panther A 108.jpg (73.3 KiB) Viewed 1 time
you have to play with them a bit so the brass fits right but once you have them how you like them then you drill a small hole where the pintle would go through. Take your time and drill slow to go through the plastic and brass.
 Panther A 109.jpg (64.71 KiB) Viewed 1 time
 Panther A 110.jpg (66.18 KiB) Viewed 1 time
[HR][/HR] Once you have the hole drilled through you need a pin so I use plastic trees from old model kits. Heat it, stretch it and you have your pins! Just cut it and push the styrene through the hole till you get it to a thick enough part that the pin is snug but not so snug that the brass catch doesn't move. Then cut it off close the side and again, using the soldering iron bring it in close to the end of the pin and just touch it gently and it will form a nice little bolt head. Do it on the other side and viola! you have a functioning catch!
 Panther A 111.jpg (64.42 KiB) Not viewed yet
The bottom release handles are simply some copper wire and some really thin copper wire. Drill your hole, bend the thicker copper wire at the bottom 90 degrees making sure you don't make it too long that it comes out the other side but long enough to mount the spring wire. Make sure you use just a slightly smaller drill bit for the hole and you can use the soldering gun idea again to mount it. wind the thin wire around the 90 degree neck and you have a nice looking hatch catch...
 Panther A 112.jpg (64.64 KiB) Not viewed yet
 Panther A 113.jpg (57.47 KiB) Not viewed yet
I secured the posts underneath and the thin copper post with 2 part epoxy and before it set real hard did a test fit. I also did a rough fit of the hatch catches to see if I had the right height.
 Panther A 114.jpg (37.06 KiB) Not viewed yet
 Panther A 115.jpg (31.25 KiB) Not viewed yet
 Panther A 116.jpg (40.49 KiB) Not viewed yet
I thought it was time to do the hatches. I was not looking forward to it because I wanted to make them sort of operational but easy enough if one got snapped off during battle it would be easy to fix.
I also wanted to make it sort of look like the real thing so I needed a tube that would have an inner tube to slide up and down and what I came up with was the end of a syringe cut off and mounted to look like the main support tube on the real thing.
Then I used a thinned down piece of copper tube that fits nice and snug in the syringe end.
well I waited for the superglue to dry thought I would add the lift handles. Now, this is a trick I use to mount my handles. I don't think I have shown it before. Sometimes getting the holes right for the handles can be tough. you make them too narrow so you have to bend the handle ends in to fit in the holes or too wide and you have to open up the handle too much and it doesn't look right so here is what I do. Make your perfect shaped handle out of a paper clip and have the ends longer than they should be so they will go into the plastic. Drill one small hole for one end of the handle to go in as a guide. Don't drill it deep just a small hole to seat the end in. Now, gently touch a hot soldering iron to it and put some slight pressure on it and it will start to go down into the plastic. Watch your depth so they don't go too far in. Once you have it right and have stopped applying heat you will find that it is pretty sturdy and shouldn't need glue. Also you can see a little of the melted plastic pushes up around the handle so you can score this with an xacto knife and it will look like weld bead!
Now I wanted to make the stops so some 2mm styrene and some sturdy brass sheet and got to work on them. I used a saw to make a split down the plastic on the ends of a long piece then cut it in half to make the 2 stops. The brass I drew the rough shape on and formed it with a dremel on slow with the piece held in hobby forceps.
you have to play with them a bit so the brass fits right but once you have them how you like them then you drill a small hole where the pintle would go through. Take your time and drill slow to go through the plastic and brass.
[HR][/HR] Once you have the hole drilled through you need a pin so I use plastic trees from old model kits. Heat it, stretch it and you have your pins! Just cut it and push the styrene through the hole till you get it to a thick enough part that the pin is snug but not so snug that the brass catch doesn't move. Then cut it off close the side and again, using the soldering iron bring it in close to the end of the pin and just touch it gently and it will form a nice little bolt head. Do it on the other side and viola! you have a functioning catch!
The bottom release handles are simply some copper wire and some really thin copper wire. Drill your hole, bend the thicker copper wire at the bottom 90 degrees making sure you don't make it too long that it comes out the other side but long enough to mount the spring wire. Make sure you use just a slightly smaller drill bit for the hole and you can use the soldering gun idea again to mount it. wind the thin wire around the 90 degree neck and you have a nice looking hatch catch...
I secured the posts underneath and the thin copper post with 2 part epoxy and before it set real hard did a test fit. I also did a rough fit of the hatch catches to see if I had the right height.
10-22-2014, 08:51 AM
#55
Wow, and I thought I was doing good putting an operational rear hatch in the turret of my Panther.
Your hatch and latch system looks good!
Jeff
Your hatch and latch system looks good!
Jeff
10-22-2014, 08:56 AM
#56
Nice work on the driver and raido operators hatches. I will use your process to build the hatch latch holder sometime soon.
10-23-2014, 07:05 PM
#57
Thanks guys, Glad you can use some ideas. I am experimenting as I go along so it's nice when the idea actually works out! LOL!
Now working on the travel lock. But first put on the periscope covers using the soldering iron method again. Make your little part and apply soldering gun to brass to make it sink into plastic until you get it to the right depth.
 Panther A 123.jpg (41.79 KiB) Not viewed yet
 Panther A 124 (1).jpg (42.46 KiB) Not viewed yet
 Panther A 125.jpg (42.1 KiB) Not viewed yet
 Panther A 126.jpg (43.27 KiB) Not viewed yet
So, on to the travel lock. I want it to move up and down so first drill it through from both ends. Do it SLOWLY and watch all the time that you are going straight in. I do a little bit from each end at a time rather than one end then the other. Don't ask me why but it seems to work better...
 Panther A 118.jpg (51.33 KiB) Not viewed yet
Then cut the lock from the frame
 Panther A 117.jpg (48.39 KiB) Not viewed yet
 for the rod I use my old HL antennas they are a fairly strong steel and work quite well in any applications where you need a small rod.
 Panther A 119.jpg (46.67 KiB) Not viewed yet
Then I added some detail with the frame pivot lock bar (hell if I know what the real name is!) On the real thing it looks like it releases the travel lock from the frame. It has a small chain so you don't loose the pintle when you open it. quick mount to test up down too. Also in this shot you can see where I cut the "V" notch into the guide arm.
 Panther A 120.jpg (38.48 KiB) Not viewed yet
 Panther A 121.jpg (39.58 KiB) Not viewed yet
 Panther A 122.jpg (38.38 KiB) Not viewed yet
Still quite a bit to do. I want to put some details on the chainlink piece that actually locks the barrel in place. Talk about over engineering a part! They could have just done a piece of curved stell over the top but noooo lets use something that looks like a full machined drive chain!
The HL ventilator that goes under the travel lock is not even close to what it looks like and it's going to be a ***** to scratch build. Stay tuned!
Now working on the travel lock. But first put on the periscope covers using the soldering iron method again. Make your little part and apply soldering gun to brass to make it sink into plastic until you get it to the right depth.
So, on to the travel lock. I want it to move up and down so first drill it through from both ends. Do it SLOWLY and watch all the time that you are going straight in. I do a little bit from each end at a time rather than one end then the other. Don't ask me why but it seems to work better...
Then cut the lock from the frame
Then I added some detail with the frame pivot lock bar (hell if I know what the real name is!) On the real thing it looks like it releases the travel lock from the frame. It has a small chain so you don't loose the pintle when you open it. quick mount to test up down too. Also in this shot you can see where I cut the "V" notch into the guide arm.
Still quite a bit to do. I want to put some details on the chainlink piece that actually locks the barrel in place. Talk about over engineering a part! They could have just done a piece of curved stell over the top but noooo lets use something that looks like a full machined drive chain!
The HL ventilator that goes under the travel lock is not even close to what it looks like and it's going to be a ***** to scratch build. Stay tuned!
10-30-2014, 07:00 PM
#59
Hey Jim, I don't think I was much help! If anything you made me discover I had the wrong screens on my KT! LOL! Oh well, it was my first big tank build in 30 years so no big deal...
So on with this puppy!
to the other guys who commented on here so far, thanks!, it makes me want to do more and more but at some point you gotta stop on one item and move on or you go crazy! 
Having said that I decided to do a little more on the travel lock. LOL! I want to simulate the chain more so I added some little round pieces of styrene to simulate the pins between the links and using a really sharp xacto I cut some groves in the links and opened the V notches where the the lock handles connect.
 Panther A 127.jpg (40.96 KiB) Viewed 1 time
 Panther A 128.jpg (29.86 KiB) Viewed 1 time
Then I decided to make the frame look proper and used some brass .8mm bolts I have for the plates that screwed into the hull
 Panther A 129.jpg (61.82 KiB) Viewed 1 time
 Panther A 130.jpg (56.99 KiB) Viewed 1 time
Next it was time to tackle the ventilator cover. I had been humming and hawing how to do this but decided to make it out of styrene. It took 2 tries to get a shape I was happy with and the right size by eye balling pictures, the travel lock and the tank hull.
 Panther A 131.jpg (50.02 KiB) Viewed 1 time
Also in looking at the pics there was a small rain guard around the ventilator so I soaked some thin styrene in glue and shapped it till I was happy. You will notice I painted where the ventilator was going to go black ahead of time as I figured it might be tough to do it later.
 Panther A 132.jpg (27.08 KiB) Viewed 1 time
Now, I got so into making this ventilator cover that I forgot to take pics as I went along! But basically I got the shape to where I was happy. I added the front rounded piece and some small side pieces as on the real one and sanded and rounded them off to the main part. Since the real thing is cast, I started adding Tamiya putty to the top to get the slight curve and thickness right. The nice part about that putty is if you spread it around as soon as you put it on it will somewhat smooth and self level. so I put on 2 layers to get the center built up. I then ever so gently drilled the 2 depressions that are above the rear legs.
 Panther A 133.jpg (27.13 KiB) Viewed 1 time
 Panther A 134.jpg (39.51 KiB) Viewed 1 time
 Panther A 135.jpg (28.92 KiB) Viewed 1 time
 Panther A 136.jpg (38.58 KiB) Viewed 1 time
So on with this puppy!
to the other guys who commented on here so far, thanks!, it makes me want to do more and more but at some point you gotta stop on one item and move on or you go crazy!
Having said that I decided to do a little more on the travel lock. LOL! I want to simulate the chain more so I added some little round pieces of styrene to simulate the pins between the links and using a really sharp xacto I cut some groves in the links and opened the V notches where the the lock handles connect.
Then I decided to make the frame look proper and used some brass .8mm bolts I have for the plates that screwed into the hull
Next it was time to tackle the ventilator cover. I had been humming and hawing how to do this but decided to make it out of styrene. It took 2 tries to get a shape I was happy with and the right size by eye balling pictures, the travel lock and the tank hull.
Also in looking at the pics there was a small rain guard around the ventilator so I soaked some thin styrene in glue and shapped it till I was happy. You will notice I painted where the ventilator was going to go black ahead of time as I figured it might be tough to do it later.
Now, I got so into making this ventilator cover that I forgot to take pics as I went along! But basically I got the shape to where I was happy. I added the front rounded piece and some small side pieces as on the real one and sanded and rounded them off to the main part. Since the real thing is cast, I started adding Tamiya putty to the top to get the slight curve and thickness right. The nice part about that putty is if you spread it around as soon as you put it on it will somewhat smooth and self level. so I put on 2 layers to get the center built up. I then ever so gently drilled the 2 depressions that are above the rear legs.
10-30-2014, 07:04 PM
#60
O.K. one more of the ventilator cover from the other side. This pic is kinda neat as the brass periscope cover is reflecting in under the ventilator cover!
 Panther A 137.jpg (40.67 KiB) Viewed 1 time
And here is the whole assembly test fitted... AND THAT'S IT FOR THE TRAVEL LOCK AND VENTILATOR COVER!!! ....maybe....
 Panther A 138.jpg (36.64 KiB) Viewed 1 time
 Panther A 139.jpg (38.34 KiB) Viewed 1 time
 Panther A 140.jpg (38.77 KiB) Viewed 1 time
 Panther A 141.jpg (38.88 KiB) Viewed 1 time
 Panther A 142.jpg (37.91 KiB) Viewed 1 time
And here is the whole assembly test fitted... AND THAT'S IT FOR THE TRAVEL LOCK AND VENTILATOR COVER!!!
10-31-2014, 07:06 AM
#61
Nice detail work on the travel lock and the exhaust fan cover.
11-02-2014, 08:55 PM
#62
Thanks Maus! I was rather pleased with the way they came out....
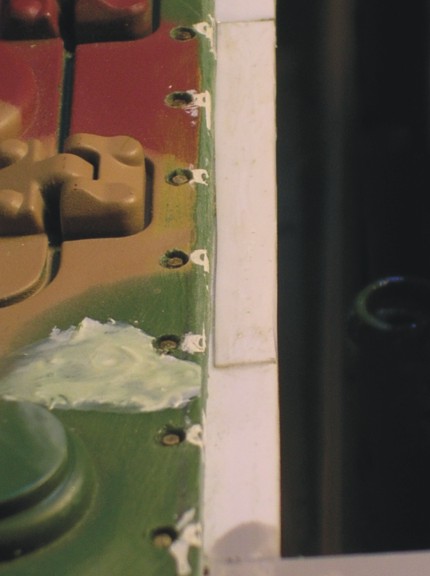
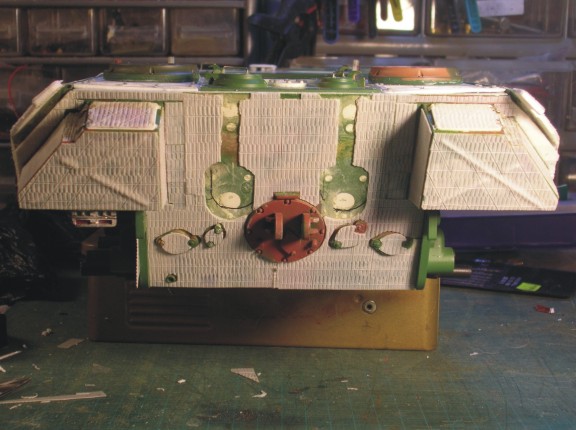
Got a little more done. One of the issues I had when I cut the rear panels out was I basically destroyed the vertical lines of molded countersunk bolts so I knew at some point I was going to have to fix this. So first I filled in the old ones with putty and sanded them off. I also filled in the rear lift hooks holes as they are a little out of position on the deck and will be re-located. Next I drew a line up the hull and marked off where the bolts should be. I then drilled .8mm holes right down through except where the holes are on the aluminum strut. Those I drilled as deep as possible. Next the simulate the countersunk holes I use a 2mm bit and gave it 2 and a 1/2 gentle rotations. cleaned the holes out and put in some more of the .8mm brass bolts I had with some super glue on the bottom of them to lock them in. Gently pushed them into the holes with an xacto knife and set them at the right depth. They are really close to the same size and once primed and painted I think they should blend right in nicely...
 Panther A 143.jpg (35.86 KiB) Not viewed yet
 Panther A 144.jpg (35.86 KiB) Not viewed yet
 Panther A 145.jpg (44.91 KiB) Not viewed yet
 Panther A 146.jpg (44.06 KiB) Not viewed yet
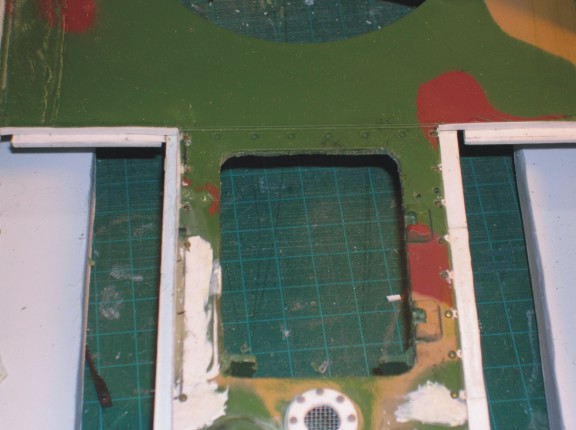
Next, I wanted to open the rear engine hatch so I can locate my on/off and smoke switch. so proceeded to cut this out using small drill holes for the corners and heated up an xacto knife for the straight parts with a candle. I have tried little saws, wire, thread, dental floss, etc... nothing really worked for me as well as the candle knife method.
 Panther A 147.jpg (67.93 KiB) Not viewed yet
 Panther A 148.jpg (47.63 KiB) Not viewed yet
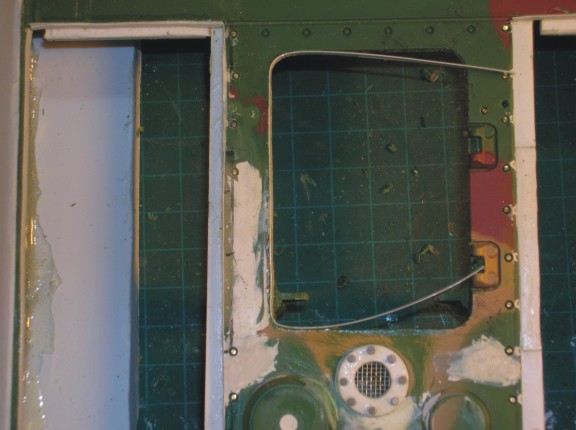
now one of the things I learned a long, long, time ago in 1/35th world is that styrene shims can be your friend when opening hatches! In this case one corner got cut off a little too square so out comes the thin, thin styrene and regular thin model glue and new corner applied. Still has to be shaped with sanding of course.
 Panther A 149.jpg (42.34 KiB) Not viewed yet
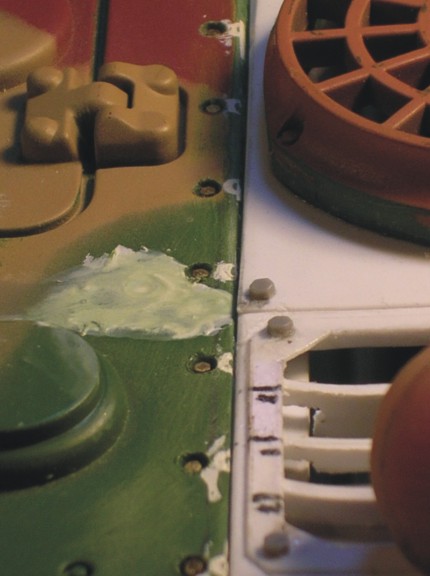
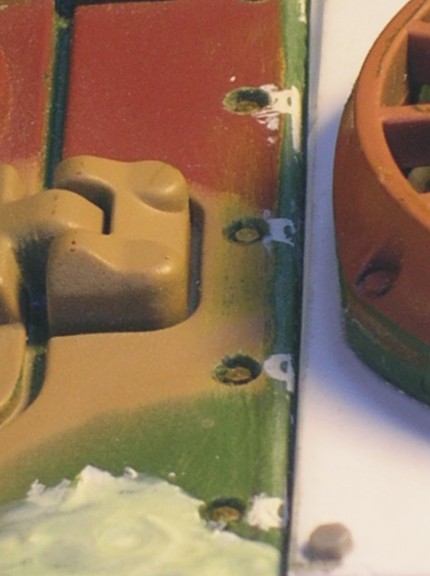
Now, this also works great with the hatch openings themselves. Lining them makes a nice smooth clean edge and makes the gaps more thin and realistic looking. In case you didn't see it before I have also done this on the front hatches and the rear deck plates to correct some misshapen edges and smooth them off.
so start with a piece that is long enough to go all the way around. Soak the side of the hatch and the middle of the strip and wait a minute for the strip to soften a bit and then stick it on.
 Panther A 150.jpg (49.71 KiB) Not viewed yet
 Panther A 151.jpg (51.99 KiB) Not viewed yet
Repeat this process and make your way around the hatch and when it has dried a little you can nick out the sections where you don't want it. In this case I didn't want it in front of the hinges.
 Panther A 152.jpg (50.06 KiB) Not viewed yet
I left the female end of the hinges on the body of the tank and will scratch them on the hatch but will make them a little more to scale too as they are a little to big and clunky compared to the real thing. and more proper bolt heads!
Got a little more done. One of the issues I had when I cut the rear panels out was I basically destroyed the vertical lines of molded countersunk bolts so I knew at some point I was going to have to fix this. So first I filled in the old ones with putty and sanded them off. I also filled in the rear lift hooks holes as they are a little out of position on the deck and will be re-located. Next I drew a line up the hull and marked off where the bolts should be. I then drilled .8mm holes right down through except where the holes are on the aluminum strut. Those I drilled as deep as possible. Next the simulate the countersunk holes I use a 2mm bit and gave it 2 and a 1/2 gentle rotations. cleaned the holes out and put in some more of the .8mm brass bolts I had with some super glue on the bottom of them to lock them in. Gently pushed them into the holes with an xacto knife and set them at the right depth. They are really close to the same size and once primed and painted I think they should blend right in nicely...
Next, I wanted to open the rear engine hatch so I can locate my on/off and smoke switch. so proceeded to cut this out using small drill holes for the corners and heated up an xacto knife for the straight parts with a candle. I have tried little saws, wire, thread, dental floss, etc... nothing really worked for me as well as the candle knife method.
now one of the things I learned a long, long, time ago in 1/35th world is that styrene shims can be your friend when opening hatches! In this case one corner got cut off a little too square so out comes the thin, thin styrene and regular thin model glue and new corner applied. Still has to be shaped with sanding of course.
Now, this also works great with the hatch openings themselves. Lining them makes a nice smooth clean edge and makes the gaps more thin and realistic looking. In case you didn't see it before I have also done this on the front hatches and the rear deck plates to correct some misshapen edges and smooth them off.
so start with a piece that is long enough to go all the way around. Soak the side of the hatch and the middle of the strip and wait a minute for the strip to soften a bit and then stick it on.
Repeat this process and make your way around the hatch and when it has dried a little you can nick out the sections where you don't want it. In this case I didn't want it in front of the hinges.
I left the female end of the hinges on the body of the tank and will scratch them on the hatch but will make them a little more to scale too as they are a little to big and clunky compared to the real thing. and more proper bolt heads!
11-07-2014, 10:22 PM
#63
Well, fail on the hatch. I did it all up, drilled the holes, put pins in but couldn't keep them as straight as I wanted to so then it occurred to me, why am I dinking around trying to make the hatch function? Just make it like my KT everything is in place just little magnet hold it on and be done with it so that is what I am going to do. you simply lift the hatch off to get at the switches. Still have to trim and file and sand a bit but you get the idea...
 Panther A 153.jpg (50.63 KiB) Not viewed yet
you will also notice I have started to add handles in the right spots and also did the lift hooks. These were stock but they are too fat compared to the real thing so I thinned them out.
 Panther A 154.jpg (46.08 KiB) Not viewed yet
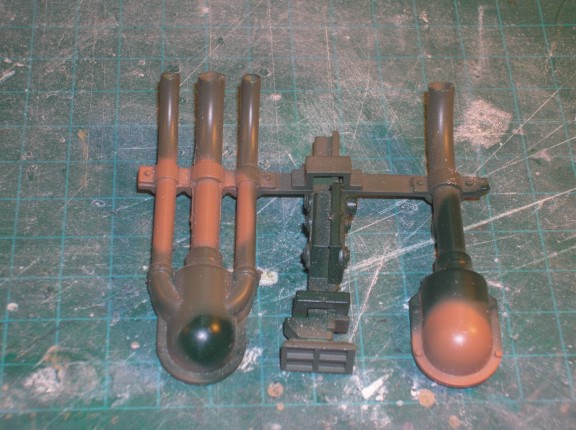
so while the hatch and stuff was drying I decided to tackle the other big thing I wanted to do on this tank, the exhaust. You remember I bought 2 Pantiger uppers and used the cooling fan covers on this tank. Well they also came with the triple exhaust.
 Panther A 155.jpg (74.39 KiB) Not viewed yet
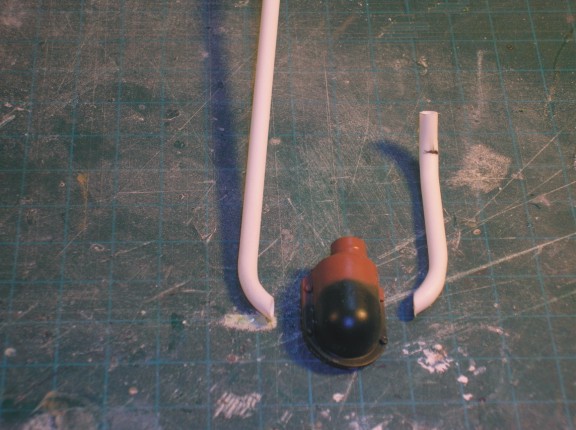
I was going to work on them to make them better but really, the pipes and the attachment point are not right so had to come up with a plan. I decided since the smaller cooling pipes actually are bent in 2 spots I wasn't going to try metal as it would really be hard to get 2 to match closely I think. So I opted for styrene tubes and used my trusty candle to slowly heat and bend the tubing till I got the 2 to look close. I am using the single exhaust and cut the pipe off to use the base.
 Panther A 156.jpg (64.58 KiB) Not viewed yet
I drilled 2 holes in the side and made them oblong to fit the pipes in. I sealed them in place with 2 part epoxy so it will take some force to break them off.
 Panther A 157.jpg (64.79 KiB) Not viewed yet
Next I wanted to add the flanges that are on the pipes where they change direction on the base so got some brass tube and cut it thin with dremel.
 Panther A 158.jpg (65.93 KiB) Not viewed yet
I used a slightly bigger diameter tube so I can simulate the flange coming out and will add a bolt head and nut to it late. So to do this you simply squeeze the ring with small needle nose pliers
 Panther A 160.jpg (55.66 KiB) Not viewed yet
And then squeeze the front of the ring together and viola! you have a neat little flange and it is tight on the tube but just to make sure I did some dots of crazy glue under the ring.
 Panther A 161.jpg (59.54 KiB) Not viewed yet
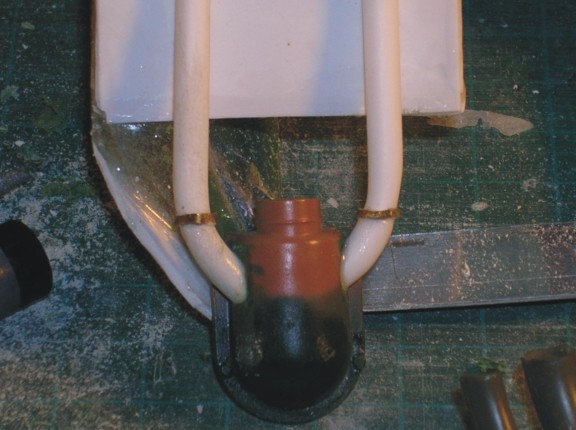 Panther A 162.jpg (57.26 KiB) Not viewed yet
And here is how they compare. I still have to bend the large center brass tube. I think they should look pretty good once finished up...
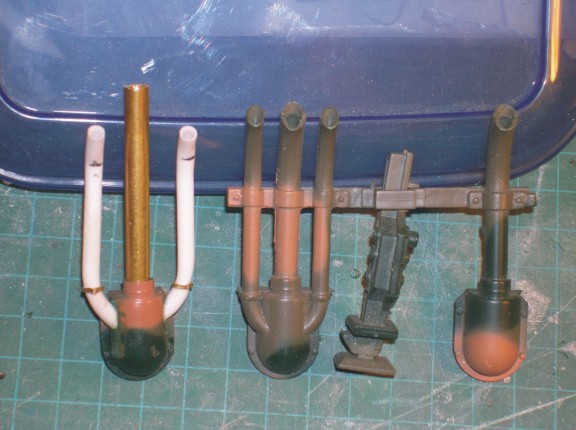 Panther A 163.jpg (61.58 KiB) Not viewed yet
you will also notice I have started to add handles in the right spots and also did the lift hooks. These were stock but they are too fat compared to the real thing so I thinned them out.
so while the hatch and stuff was drying I decided to tackle the other big thing I wanted to do on this tank, the exhaust. You remember I bought 2 Pantiger uppers and used the cooling fan covers on this tank. Well they also came with the triple exhaust.
I was going to work on them to make them better but really, the pipes and the attachment point are not right so had to come up with a plan. I decided since the smaller cooling pipes actually are bent in 2 spots I wasn't going to try metal as it would really be hard to get 2 to match closely I think. So I opted for styrene tubes and used my trusty candle to slowly heat and bend the tubing till I got the 2 to look close. I am using the single exhaust and cut the pipe off to use the base.
I drilled 2 holes in the side and made them oblong to fit the pipes in. I sealed them in place with 2 part epoxy so it will take some force to break them off.
Next I wanted to add the flanges that are on the pipes where they change direction on the base so got some brass tube and cut it thin with dremel.
I used a slightly bigger diameter tube so I can simulate the flange coming out and will add a bolt head and nut to it late. So to do this you simply squeeze the ring with small needle nose pliers
And then squeeze the front of the ring together and viola! you have a neat little flange and it is tight on the tube but just to make sure I did some dots of crazy glue under the ring.
And here is how they compare. I still have to bend the large center brass tube. I think they should look pretty good once finished up...
11-09-2014, 07:54 PM
#64
So I think I have all the detailing on the back deck done to the point it is ready to mount me thinks:
 Panther A 165.jpg (59.37 KiB) Not viewed yet
 Panther A 166.jpg (53.88 KiB) Not viewed yet
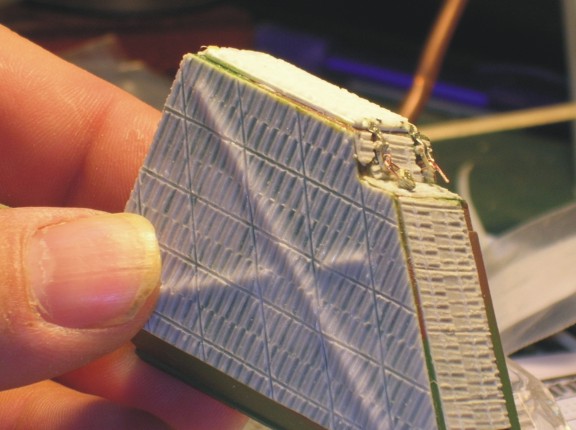
So I decided to take a whack at finishing the zim on the 2 storage boxes and thought what the heck why not add some PE I had left over from doing my L70. Just because I am a glutton for punishment! So first thing I did was add some hatch plates to the top of the boxes and then finished the zim on the whole box. I will milliput the seams shortly to smooth everything out. So then I went to work on the latches. So here is the result. There are some guys on here that solder them and make them so neat and tidy I have no idea how! But this is about as good as these old hands and eyes can do...
 Panther A 167.jpg (48.45 KiB) Not viewed yet
 Panther A 168.jpg (49.07 KiB) Not viewed yet
 Panther A 169.jpg (45.47 KiB) Not viewed yet
 Panther A 170.jpg (55.72 KiB) Not viewed yet
With these pics you get my fingers to show the scale of this stuff. It's little!
 Panther A 171.jpg (55.47 KiB) Not viewed yet
 Panther A 172.jpg (46.58 KiB) Not viewed yet
 Panther A 173.jpg (45.8 KiB) Not viewed yet
And just for fun I made them operational for the time being. I don't know whether I will leave them this way or not... Would be a pity and pain if they need to be replaced because they opened and got broke off...
 Panther A 174.jpg (49.04 KiB) Not viewed yet
So I decided to take a whack at finishing the zim on the 2 storage boxes and thought what the heck why not add some PE I had left over from doing my L70. Just because I am a glutton for punishment! So first thing I did was add some hatch plates to the top of the boxes and then finished the zim on the whole box. I will milliput the seams shortly to smooth everything out. So then I went to work on the latches. So here is the result. There are some guys on here that solder them and make them so neat and tidy I have no idea how!
With these pics you get my fingers to show the scale of this stuff. It's little!
And just for fun I made them operational for the time being. I don't know whether I will leave them this way or not... Would be a pity and pain if they need to be replaced because they opened and got broke off...

 11-10-2014, 05:54 AM
#66
PE looks good to me!!! It is fun to work with though???
11-16-2014, 02:38 PM
#67
Yep, fun to work with for sure!
A slow week this week. , I wish I could put more time to it. But with full time job and wifey having me do things too it is never enough! The other thing is most of what I am doing here is first time stuff so it takes a little trial and error to progress through the mods. Like anything by about the 3 or 4th one I can almost guarantee it will take 1/2 the time!
I average 2 or 3 hours a night and on the weekends sometimes 4 or 5 a night but this weekend was a bit of a bust too much to do but got a couple of more things done.
First laid up the storage bins on the back of the tank. I have the convoy light wired so drilled the hole out and set it up
 Panther A 179.jpg (51.02 KiB) Viewed 4 times
Then using Bob Smith Plastic Cure glue, (the best I know of) and some heavier clamps tacked the boxes on.
 Panther A 180.jpg (58.45 KiB) Viewed 4 times
 Panther A 181.jpg (67.62 KiB) Viewed 4 times
Well those dried and hardened thought I would tackle the towing pintle. The one that's modeled on the HL seems to be modeled on the "A" at Munster. So I started fabricating that from a reference book that Hotte sent me (thanks buddy!) and this book has been invaluable in planning and building this project. So spent a couple or 3 hours doing it it up BUT, from what I can tell this is not the correct one! The more I looked at other reference the more I realized at least for the "A"s, this is not the correct one. So I used some online illustrations and my Panther in Detail by Culver & Feist. A great reference book to start over and build the one I think is more accurate.
 Pintle.jpg (52.98 KiB) Viewed 4 times
And here are the results! Brass pipe, some putty, little chain and copper itty bitty drill bit a little solder and about 3 hours work!
 Panther A 182.jpg (52.06 KiB) Viewed 4 times
 Panther A 184.jpg (49.03 KiB) Viewed 4 times
And fitted my power and smoker switch box into the upper hull. Just fitted it, didn't click it in yet!
 Panther A 183.jpg (58.71 KiB) Viewed 4 times
Hopefully I have a more productive week this week!
A slow week this week. , I wish I could put more time to it. But with full time job and wifey having me do things too it is never enough!
I average 2 or 3 hours a night and on the weekends sometimes 4 or 5 a night but this weekend was a bit of a bust too much to do but got a couple of more things done.
First laid up the storage bins on the back of the tank. I have the convoy light wired so drilled the hole out and set it up
Then using Bob Smith Plastic Cure glue, (the best I know of) and some heavier clamps tacked the boxes on.
Well those dried and hardened thought I would tackle the towing pintle. The one that's modeled on the HL seems to be modeled on the "A" at Munster. So I started fabricating that from a reference book that Hotte sent me (thanks buddy!) and this book has been invaluable in planning and building this project. So spent a couple or 3 hours doing it it up BUT, from what I can tell this is not the correct one! The more I looked at other reference the more I realized at least for the "A"s, this is not the correct one. So I used some online illustrations and my Panther in Detail by Culver & Feist. A great reference book to start over
And here are the results! Brass pipe, some putty, little chain and copper itty bitty drill bit a little solder and about 3 hours work!
And fitted my power and smoker switch box into the upper hull. Just fitted it, didn't click it in yet!
Hopefully I have a more productive week this week!
11-24-2014, 06:45 PM
#68
Herman, that's a big word and sounds like it should be in a porno title...
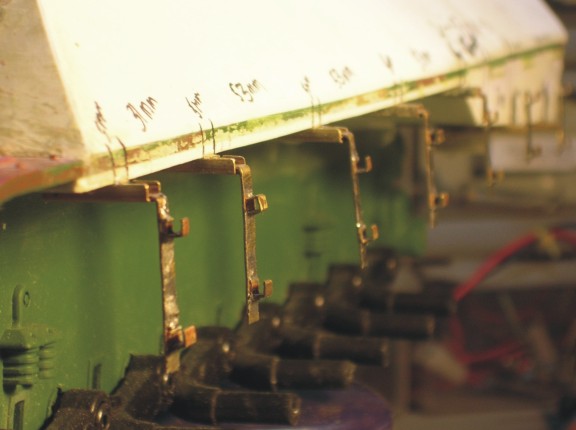
working hard on the next big thing to do on this tank and it is painful to the extreme... I wanted to add the Sch�rzen skirts to this tank, oh boy, more scratch building. I should mention I don't have any fancy tools, drill press, lathe, stamping equipment, etc... Just my exacto, dremel, the basics so these will look a little crude but 20 feet away on our battlefield won't matter. Plus they will be functional and I hope fall off on occasion just for fun!
So I will let the pics speak for themselves. Using my line drawings and pics from assorted sources I used brass rectangle and square tube, and impact skirts meant for the Tamiya "G" model cut down. You can buy these really cheap as they have cosmetic blemishes but won't affect the final look of course.
Attachments Panther A 185.jpg (56.01 KiB) Not viewed yet
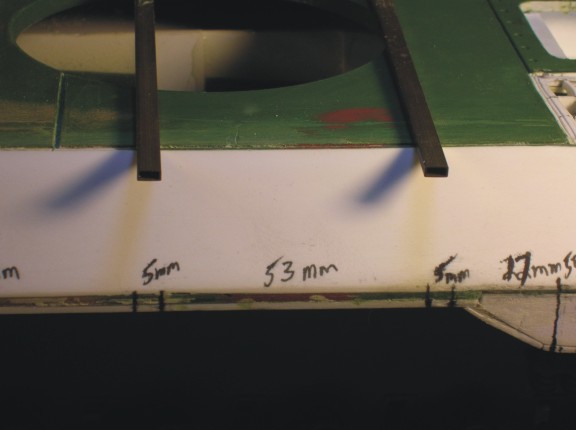 Panther A 186.jpg (29.69 KiB) Not viewed yet
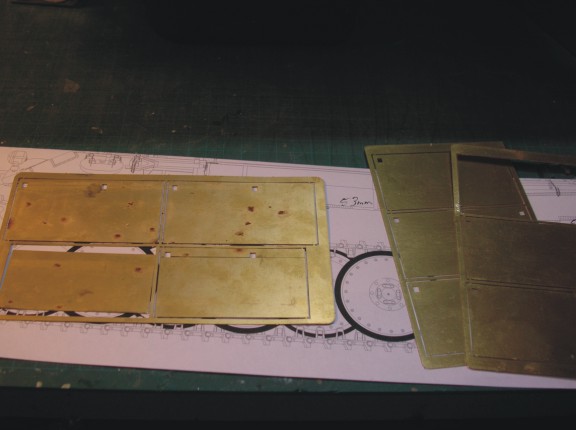 Panther A 187.jpg (36.16 KiB) Not viewed yet
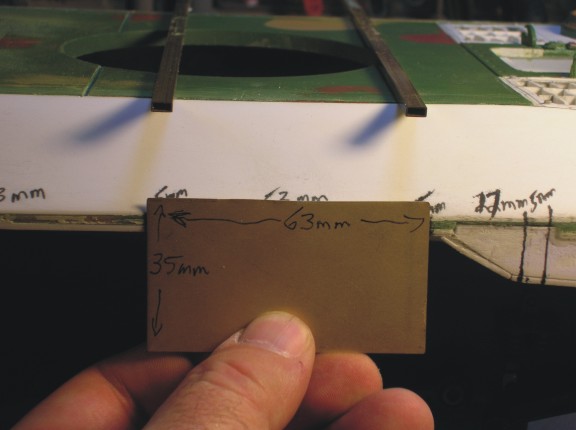 Panther A 189.jpg (35.24 KiB) Not viewed yet
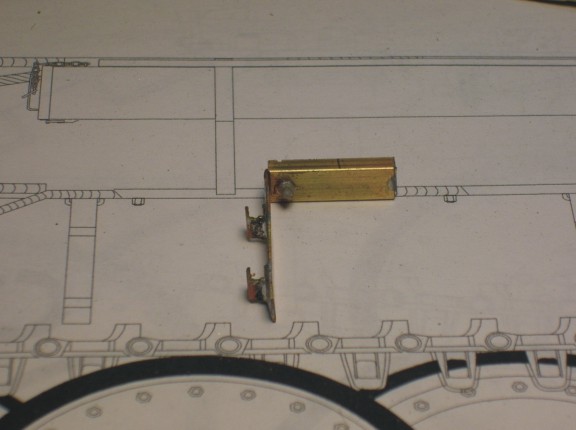 Panther A 190.jpg (37.23 KiB) Not viewed yet
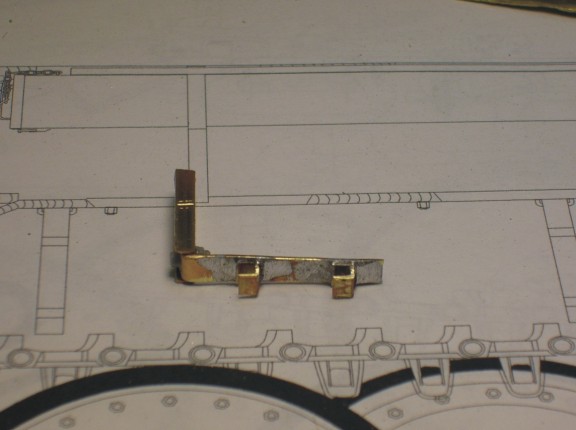 Panther A 191.jpg (37.85 KiB) Not viewed yet
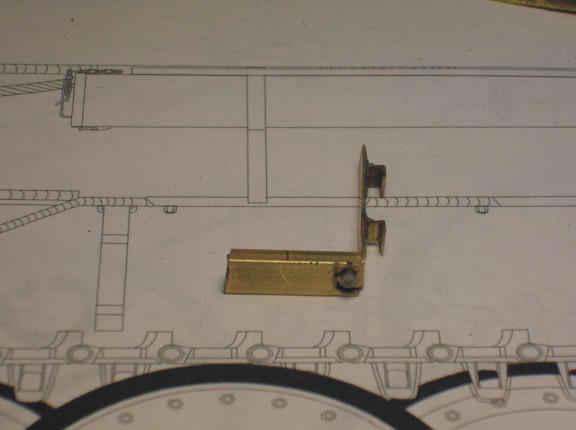 Panther A 192.jpg (37.55 KiB) Not viewed yet
 Panther A 193.jpg (29.42 KiB) Not viewed yet
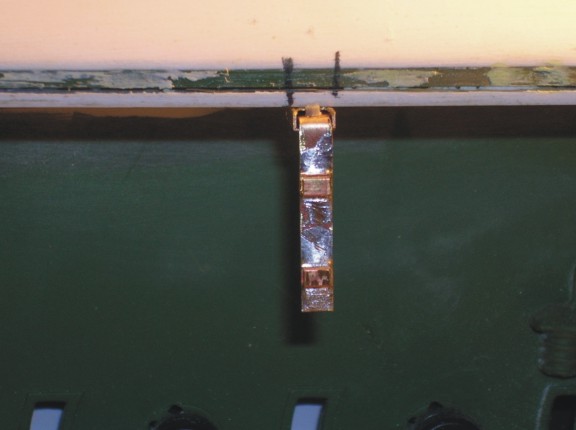 Panther A 194.jpg (31.77 KiB) Not viewed yet
 Panther A 195.jpg (31.6 KiB) Not viewed yet
working hard on the next big thing to do on this tank and it is painful to the extreme... I wanted to add the Sch�rzen skirts to this tank, oh boy, more scratch building. I should mention I don't have any fancy tools, drill press, lathe, stamping equipment, etc... Just my exacto, dremel, the basics so these will look a little crude but 20 feet away on our battlefield won't matter. Plus they will be functional and I hope fall off on occasion just for fun!
So I will let the pics speak for themselves. Using my line drawings and pics from assorted sources I used brass rectangle and square tube, and impact skirts meant for the Tamiya "G" model cut down. You can buy these really cheap as they have cosmetic blemishes but won't affect the final look of course.
Attachments
11-24-2014, 06:46 PM
#69
And here are some more. AA LOT of adjustment as I went along and still have some to do but I like the look of it so far...
 Panther A 196.jpg (55.81 KiB) Not viewed yet
 Panther A 197.jpg (57.01 KiB) Not viewed yet
 Panther A 198.jpg (51.87 KiB) Not viewed yet
What I did was slide the arms into the bracket and soldered at the back. What this does is create a sort of spring effect that lets the arms move around but are very secure...
 Panther A 199.jpg (38.5 KiB) Not viewed yet
 Panther A 200.jpg (40.74 KiB) Not viewed yet
 Panther A 201.jpg (59.41 KiB) Not viewed yet
 Panther A 204.jpg (51.74 KiB) Not viewed yet
Attachments Panther A 205.jpg (51.61 KiB) Not viewed yet
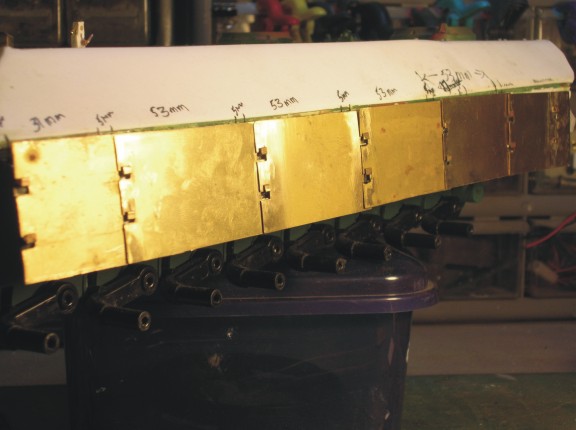 Panther A 206.jpg (43.01 KiB) Not viewed yet
 Panther A 207.jpg (40.71 KiB) Not viewed yet
What I did was slide the arms into the bracket and soldered at the back. What this does is create a sort of spring effect that lets the arms move around but are very secure...
Attachments
11-24-2014, 07:56 PM
#70
In the meantime someone PM'd me for a shot more head on and from underneath. I also still have to add nuts and bolts to the tops of all the frames as on the real thing and there are small lock plates that will be put on the front to close up any gaping that shouldn't be there...Attachments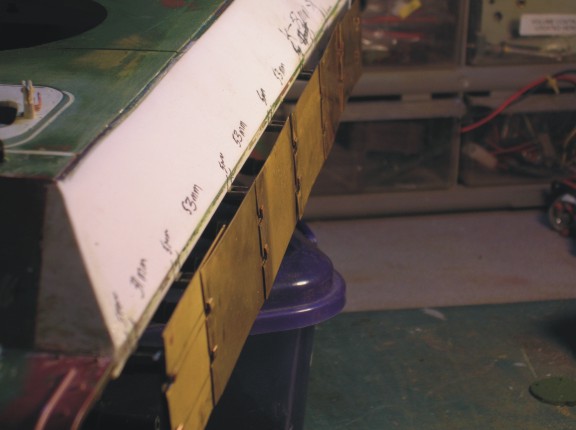 Panther A 208.jpg (38.69 KiB) Viewed 1 time
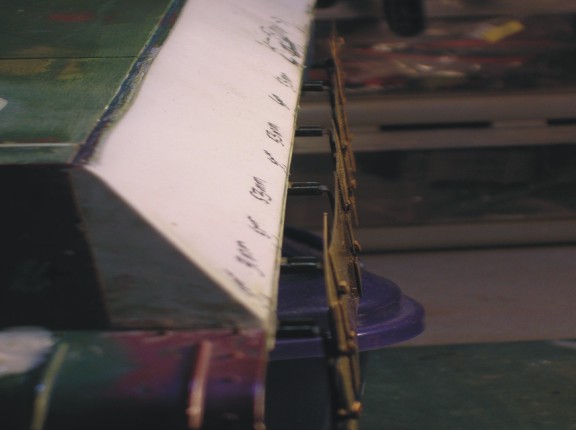 Panther A 209.jpg (31.86 KiB) Viewed 1 time
 Panther A 210.jpg (33.79 KiB) Viewed 1 time
 Panther A 211.jpg (39.97 KiB) Viewed 1 time
 11-26-2014, 06:16 AM
#73
Some extreme work going on here as it's nice to see another Panther Fan.
Jeff
Jeff
11-26-2014, 07:19 AM
#74
Thanks guys!
YHR- yea, I like to at least try to make things work as they should. I can always tack things down if there is too much issue with the plates being loose.
Panther F - it is one of my favourites and one of HL's best running kits although by the time I am done with it maybe not so much! LOL!
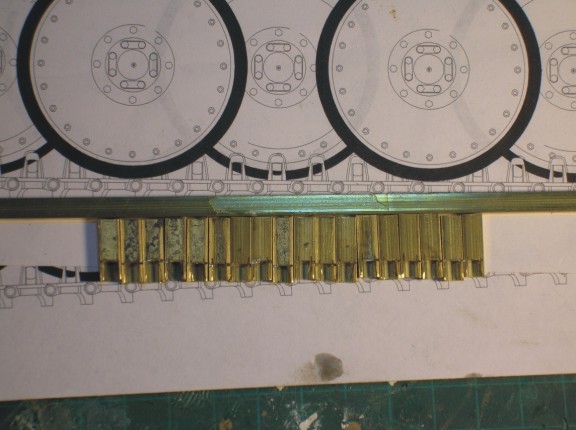
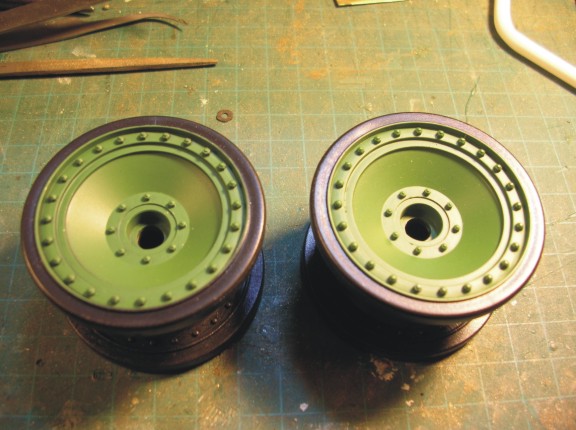
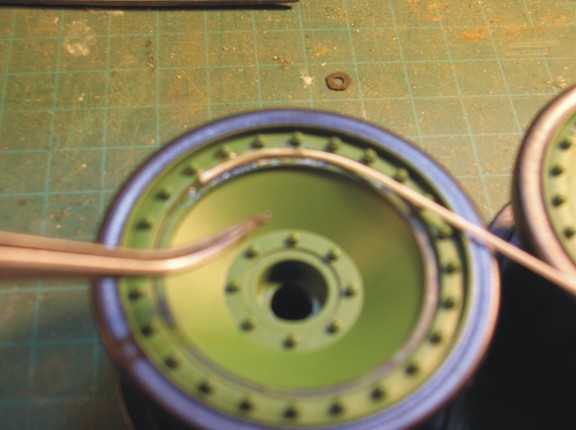
Enough playing with brass So now I want to address the HL road wheels ridge issue. I see some different methods tried by lots of people usually involving putty which I wanted to try and avoid so I choose styrene itty bitty strips and some knife work. So first here is the pic showing the ridges that everyone talks about.
 Panther A 212.jpg (65.33 KiB) Not viewed yet
Take a new xacto knife blade and snap the the tip off. I use this to scrape the paint off so we are gluing directly to plastic.
 Panther A 213.jpg (49.11 KiB) Not viewed yet
I am using .020 x .030 strips of styrene
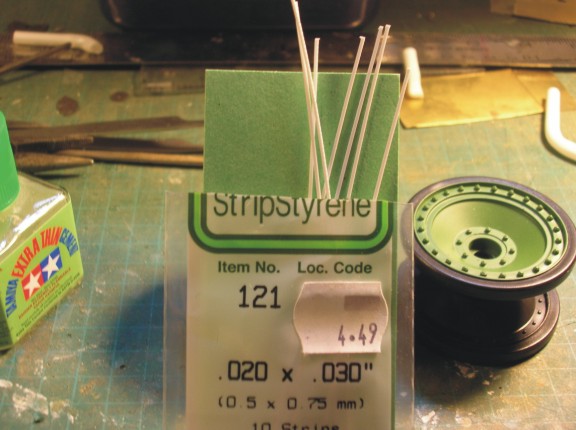 Panther A 214.jpg (57.92 KiB) Not viewed yet
Sorry these are a little blurry. So using Tamiya extra thin glue I dab a little on the wheel and dab some on the beginning of the strip and wait 30 seconds till it gets a bit tacky and then using the curvd tweezers I start putting it into the groove
 Panther A 215.jpg (47.87 KiB) Not viewed yet
It takes 2 strips with this method so started the next one
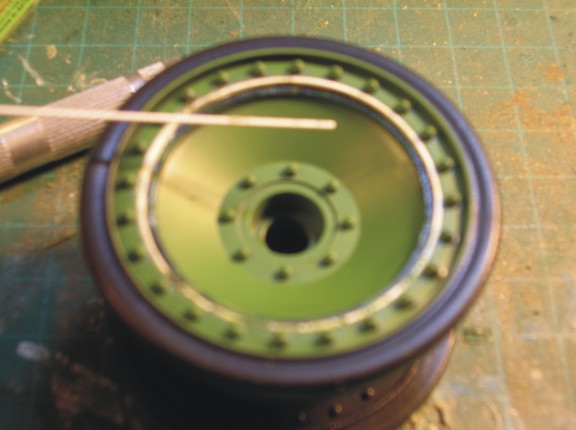 Panther A 216.jpg (44.77 KiB) Not viewed yet
Let these dry OVERNIGHT!!! if you start on them any sooner the styrene will still be soft and it will mak a mess. Then using the knife with the broke off tip start scraping away any ridge that is left and rounding the new white styrene into the wheel.
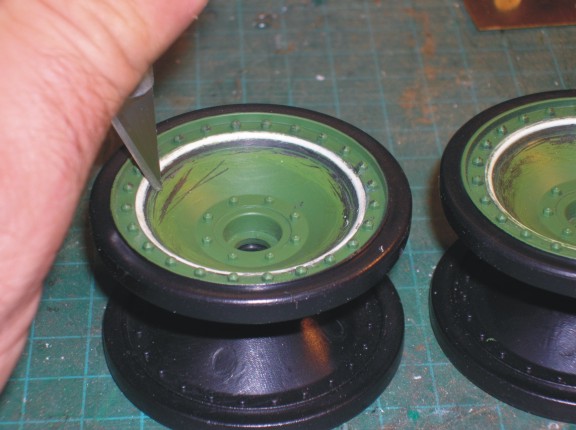 Panther A 217.jpg (54.73 KiB) Not viewed yet
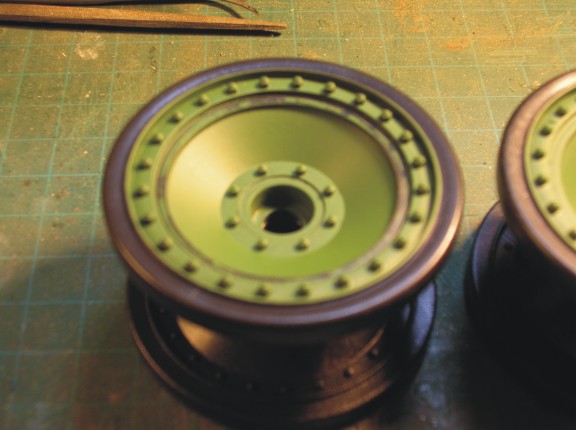
And finally a little sanding and gentle filing making sure not to hit the bolt heads and you have a more realistic road wheel.
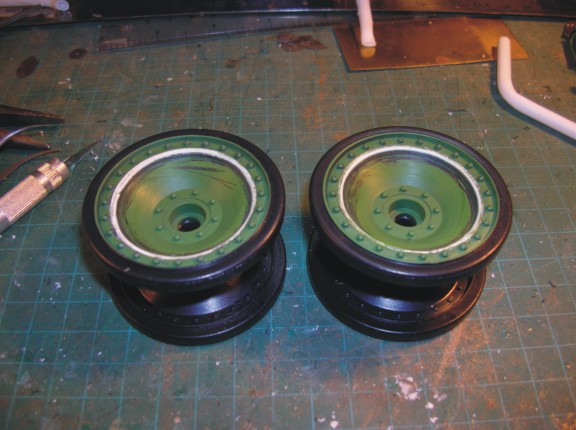 Panther A 218.jpg (62.15 KiB) Not viewed yet
I will be using Mr. Surfacer to give it the proper cast surface look it should have and this will also blend everything in together to make it seamless...
YHR- yea, I like to at least try to make things work as they should. I can always tack things down if there is too much issue with the plates being loose.
Panther F - it is one of my favourites and one of HL's best running kits although by the time I am done with it maybe not so much! LOL!
Enough playing with brass So now I want to address the HL road wheels ridge issue. I see some different methods tried by lots of people usually involving putty which I wanted to try and avoid so I choose styrene itty bitty strips and some knife work. So first here is the pic showing the ridges that everyone talks about.
Take a new xacto knife blade and snap the the tip off. I use this to scrape the paint off so we are gluing directly to plastic.
I am using .020 x .030 strips of styrene
Sorry these are a little blurry. So using Tamiya extra thin glue I dab a little on the wheel and dab some on the beginning of the strip and wait 30 seconds till it gets a bit tacky and then using the curvd tweezers I start putting it into the groove
It takes 2 strips with this method so started the next one
Let these dry OVERNIGHT!!! if you start on them any sooner the styrene will still be soft and it will mak a mess. Then using the knife with the broke off tip start scraping away any ridge that is left and rounding the new white styrene into the wheel.
And finally a little sanding and gentle filing making sure not to hit the bolt heads and you have a more realistic road wheel.
I will be using Mr. Surfacer to give it the proper cast surface look it should have and this will also blend everything in together to make it seamless...
12-09-2014, 09:15 PM
#75
Well guys, had to take a week break to get my tanks ready and organize our club get together but back at it now. It was time to tackle the zim. I really love working with this stuff. I know the kits are a bit expensive but having done all kinds of putty and burn zim, this is just soooo much easier!
It took some fitting and cutting and re-use of small pieces since this kit is made for a Tamiya G so there are some things that had to be adjusted of course.
First I had to replace the back tow pull points
 Panther A 219.jpg (41 KiB) Not viewed yet
So here are the pics of the zim pretty well finished up except for the lower one side.
 Panther A 220.jpg (70.29 KiB) Not viewed yet
 Panther A 221.jpg (60.57 KiB) Not viewed yet
 Panther A 222.jpg (45.62 KiB) Not viewed yet
Notice how the zim "bends" over the edges of the sides as per the real thing. This is done using a heat gun CAREFULLY just warm it to the point it flexes and then push it down with fingers. Yes, it;s a little warm but the results are much better than if you use a tool. You can just "feel" when it bends down right.
 Panther A 223.jpg (47.37 KiB) Not viewed yet
 Panther A 224.jpg (54.94 KiB) Not viewed yet
 Panther A 225.jpg (52.85 KiB) Not viewed yet
 Panther A 226.jpg (62.17 KiB) Not viewed yet
It took some fitting and cutting and re-use of small pieces since this kit is made for a Tamiya G so there are some things that had to be adjusted of course.
First I had to replace the back tow pull points
So here are the pics of the zim pretty well finished up except for the lower one side.
Notice how the zim "bends" over the edges of the sides as per the real thing. This is done using a heat gun CAREFULLY just warm it to the point it flexes and then push it down with fingers. Yes, it;s a little warm but the results are much better than if you use a tool. You can just "feel" when it bends down right.